spoon

Crockpot Pulled Pork v2.0

3

Category: , , ,

It's recipe swap reveal day! The theme this time around was Burgers/Sandwiches and I was given Pulled Pork Sandwiches from Dough See Dough. I know what you're thinking, and you're right, this photo is not a sandwich. We did make this into sandwiches, twice, and I didn't get a photo either time. However, I did capture this quesadilla photo which I made from the leftovers.


The photo wasn't my only issue. I had a moment of panic when I smelled something sweet as I was pouring what I thought was chicken stock into the crockpot. It wasn't chicken stock. It was pineapple juice! Ugh! Note to self, you may want to consider labeling the containers you put in the freezer! Despite my mistake, this recipe turned out well and we enjoyed this for several meals as sandwiches with coleslaw and as quesadillas. There was still more leftover which I froze for a future meal.

Since this utilizes the crockpot, it was a perfect recipe to make during the heat wave that hit New England last week. If you're in for a heat wave this weekend or are hosting a July 4th picnic, you may want to dust off your crockpot and let it do the work while you sit in front of the air conditioning with a drink!

Check out A Taste of Home Cooking for the upcoming Recipe Swap Roundup: Burgers/Sandwiches.

Here is what you'll need:
  • 1 large onion, chopped
  • 4 lb pork shoulder roast
  • 1 cup homemade barbecue sauce
  • 1/2 cup apple cider vinegar
  • 1/2 cup chicken broth
  • 1/4 cup brown sugar
  • 1 Tbsp yellow mustard
  • 1 Tbsp Worcestershire sauce
  • 1 Tbsp chili powder
  • 4 cloves garlic, chopped
Place chopped onion in the bottom of crockpot. Place pork roast on top of onions.

Combine remaining ingredients in a bowl and stir to combine. Pour over roast.

Cover crockpot and cook on low for 9-10 hours, or until roast shreds easily with a fork.

Transfer roast from crockpot to a large cutting board. Shred roast using two forks. Return meat to crockpot, stir and cook for 30 minutes. Serves 10+.

Source: Dough See Dough

Turkey Burger Pitas with Tzatziki

2

Category: , , ,

Greek food is pretty high up on my list of favorites. I'm known for ordering a gyro platter (gyro, Greek salad and fries or soup) at our neighborhood pizza joint. When I saw these burgers pop up on A Taste of Home Cooking I knew they needed to make an appearance on our meal plan.


While this recipe looks like a lot of work, this meal came together fairly quickly. I made the tzatziki and while it was chilling I made the burgers, cooked them and assembled dinner. You could also make the components the night before or morning of, which I love to do in order to make dinnertime more manageable.

The tzatziki really makes this meal great! The burgers were really juicy due to the zucchini, but I think next time I'll add some oregano and possibly feta to bump up their flavor a bit. If you like Greek food, these are well worth putting on your weekly meal plan!

For the Tzatziki:
  • 1/2 English Cucumber, peeled, seeded and finely diced
  • 12 oz Greek yogurt
  • 1 garlic cloves, minced
  • 1 tsp white wine vinegar
  • 1 tsp olive oil 
  • 1 tsp lemon juice
  • salt and pepper to taste
Mix all ingredients in a small mixing bowl. Refrigerate for 30 minutes or longer.

For the Burgers:
  • 3/4 lb ground turkey
  • 1 small zucchini, shredded
  • 1/4 small onion, shredded
  • 1 Tbsp cilantro
  • salt pepper
  • 2 tsp olive oil
Mix all ingredients in a large mixing bowl. Divide into 8 portions, and form each portion into a mini burger about 1-1/2 inch thick.

Preheat a small frying pan over medium-high heat. Add burgers to the pan and cook for about 6 minutes. Flip and cook on second side for another 5-6 minutes.

To Serve:
  • 2 pita with pockets, cut in half
  • 1/2 English cucumber, sliced thinly
  • 1 small tomato, sliced thinly
  • 1/2 onion, sliced thinly
Place cucumber, tomato and onion slices in a pita half. Add 2 burgers and top with tzatziki.

Serves: 4, 2 mini burgers each

Source: Adapted from Weight Watchers as seen on A Taste of Home Cooking

Peanut Butter Pancakes

4

Category: ,

Once in a while JR will request breakfast, and since he is not normally a breakfast eater I jump at the chance to fulfill his request. Last weekend he asked if we had peanut butter chips; he wanted peanut butter pancakes. Just so happens, I picked up a big bag a week or so prior.

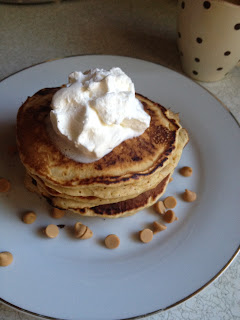
I wanted to kick up the peanut butter flavor a bit, so I used peanut butter in place of butter in the batter. Topped with a dollop of freshly whipped cream and a drizzle of real maple syrup, you basically have dessert for breakfast! And I don't think that's a bad thing (occasionally)!

I had every intention of getting these on the blog last week, but they were gone before I could get a photo. JR loved these so much he asked for them again Friday, so I snagged a photo quickly before heading out to work. Coming from a non-breakfast guy, 2 requests in one week speaks to just how good these are!

Here is what you'll need:

  • 1 1/2 cups flour
  • 1 3/4 tsp baking powder
  • 1 tsp salt
  • 3 Tbsp sugar
  • 2 eggs
  • 1 cup milk
  • 3 Tbsp peanut butter, melted
  • 9 tsp peanut butter chips
  • Stick butter for greasing griddle
Preheat griddle to 325-350F degrees.

Sift together flour, baking powder, salt and sugar in a large mixing bowl.

Beat eggs, milk and melted peanut butter in a small mixing bowl. Add to dry ingredients and whisk until well combined.

Rub one end of the stick of butter over the griddle to grease it.

Drop 1/4 cup scoops of batter onto hot griddle.  Sprinkle 1 tsp of peanut butter chips over each pancake.

Cook first side of pancake for about 3 minutes until bottom is browned and tiny bubbles rise to the top and pop. Flip and cook second side about 2 minutes until browned on the bottom.

Makes 9 pancakes.

Source: Adapted from Rosemary Brown's Big Kitchen Instruction Book

Melissa's Bolognese Sauce

2

Category: , , , ,

When I was assigned I Was Born to Cook for the latest Blogger's Choice Recipe Swap, first I audibly exclaimed "YES!", then I started searching for something Italian to make. I mean Melissa is 3/4 Italian, so if I wanted something authentic this was about as close as I was going to get. 

Melissa's Bolognese Sauce was recipe choice #2. Recipe #1 was Pasta e Fagioli, however, I made the fatal mistake of using an un-smoked ham hock. After my additions to bump up the flavor, the resulting soup, while delicious, no longer resembled Melissa's recipe. Note to self, when it says smoked, use smoked!

Not quite ready, still simmering and reducing
I am so glad I was forced on to recipe #2 because this was fantastic! I must confess that I have never made bolognese before, as I'm not big into meat sauce (or so I thought). I also never started a sauce with mirepoix (onion, celery and carrots), and I'm really struggling to think of when I've made a sauce that included wine. That's a lot of confessions in one post! Having said of all that, I realize that I haven't had good meat sauce until now either.

Not only was this fantastic, this was so much fun and easy to make! I felt as if a friend was reading the recipe to me as I was reading through it. Melissa cooks a lot like I do, a pinch of this, 1/2 cup (maybe a little more) of that...that's exactly how I cook. I've actually found it difficult to discipline myself to measure in order to document recipes here on the blog.

If you haven't had good meat sauce, make this for Sunday dinner. Your family will thank you (and you'll thank Melissa like I am!) for dinner and the leftovers which were equally good, if not better.


Here is what you'll need:
  • 1/4 cup olive oil
  • pinch of crushed red pepper
  • 1 stalk celery, chopped
  • 2 carrots, peeled and chopped
  • 1 large onion, chopped
  • 1 portobello mushroom, chopped
  • 3 garlic cloves, minced
  • sea salt and fresh black pepper to taste
  • 1 lb ground sirloin beef  
  • 1/2 cup (maybe a bit more) dry white or red wine (I used white)
  • 28 oz can of crushed tomatoes 
  • 1 Tbsp fresh basil, chopped
In a Dutch oven over medium-high heat, add oil and crushed red pepper. Once oil is heated, add celery, carrots, onions, mushrooms and garlic. Cook, stirring as needed, until soft and beginning to brown. Once the mushrooms begin to brown add salt and pepper. Cook about 8 minutes.

Add ground beef and break up using a wooden spoon. Salt and pepper, and stir meat until it is all browned (no pink remains). Add wine, stir with a wooden spoon to de-glaze the pan, and cook about 3 minutes.

Add tomatoes and basil. Stir, reduce heat to low and simmer, stirring as needed, until sauce reduces a bit, about 20 minutes. Serve over pasta. Serves 4-6.

Source: Slightly adapted from I Was Born to Cook

Mango Passion Fruit Glazed Chicken Skewers

1

Category: , ,

Do you ever buy something, try it and think, "meh." Then a few days later you catch yourself grabbing for it thinking, "it wasn't that bad." That is until you are eating it and thinking, "I paid $3 for this, there is no way I am throwing this away." Who's with me?

I hate waste, and I've mentioned before that I'm really trying to cut down on it. One thing I'm learning is that if I stick to cooking staples, I'm better off. However, I've mentioned before I have an obsession with jelly and jams. Whenever I see a unique flavor I have to pick it up. More ofthen than not I like it, however, once in awhile something comes along that just isn't pleasing to my palate.

Enter mango passion fruit fruit spread. It sounds good, but it's not. I've tried it several times thinking, "it wasn't that bad" and after tasting it I remember, "meh." Thanks to Branny Boils Over, I found a way to use up those "meh" jelly and jams that really isn't that bad!

These chicken skewers were super simple and have a lot of palate-pleasing flavor. I was a little apprehensive about rosemary with these flavors, but it worked so I'm thinking you could substitute with just about any flavor jelly/jam/fruit spread. If you're apprehensive about the rosemary, go ahead and use another herb in it's place.

Here is what you'll need:
  • 2 springs fresh rosemary, divided
  • 1 tsp brown sugar
  • salt and pepper 
  • 1/4 tsp crushed red pepper flakes
  • 2 boneless, skinless chicken breasts, trimmed of excess fat and cut into 1-inch cubes
  • 1/2 cup mango passion fruit fruit spread
  • 2 tsp soy sauce
  • 2 tsp white wine vinegar 
  • oil for the grill
Combine 1 sprig of rosemary, brown sugar, salt, pepper and red pepper flakes in a mixing bowl. Add the chicken cubes and mix well to coat all the pieces.

Place chicken on skewers and allow to marinate 30 minutes.

Preheat grill to medium-high heat.

Just before grilling, combine remaining rosemary, fruit spread, soy sauce and vinegar in a small saucepan. Heat over medium-low heat until well combined and thinned out. Set aside. (You could even heat this on the grill while the chicken is cooking).

Brush a little oil on the grill grate to help prevent the chicken from sticking. Place the chicken skewers on the grill and cook for about 3-5 minutes per side until browned. Turn skewers every 3-5 minutes until 3 sides are browned. When the last side is browning, use a pastry brush to coat the kabobs with the fruit glaze.

Total cooking time is about 12-14 minutes. Serves 2.

Source: Adapted from Fine Cooking via Branny Boils Over

How Does My Garden Grow: Early June

3

Category:

I can't believe it's been just 3 short weeks since I last posted about my garden! Big things are happening here, and I'm so excited. First, take a look at this beautiful bowl of greens (arugula, romaine and spinach), scallions and chives that I picked for dinner tonight. Paired with those apple sized radishes and sweet red onions from the farmer's market, we had a crunchy, slightly spicy and fresh salad to accompany dinner tonight.


Okay, now on to the big things. We went from this:


to this! In 3 weeks!

Thank you sun, rain and amazing soil! As you can see, all the squash are healthy! We're seeing signs of baby zucchini...

and white turnip heads....

There are tons of flowers on the peas and tomatillos. The radishes are plenty, and the brussel sprouts, cucumbers and peppers all look strong.


Sugarsnap peas are flowering as well, the scallions may make it, however, the dill was a bust and has bolted.

The tomatoes are strong, with a few plants already flowering.


And the black raspberries, well, we got them fenced and netted. However, as you can see, they've bolted right through the netting and continue to be out of control. They are producing a lot of fruit which I'm pleased about. I need to read up on the possibilities of transplanting these bushes. We're talking about moving them to the back of the yard, away from the house, since they are a bit unsightly. Not to mention, they are growing up under the siding now.


How is your garden growing? I'd love to hear what's working, as well as what's not working, for you. 

Hershey's Creamy Cinnamon Chips Cheesecake

3

Category:

JR's birthday was this week and I had a lot of making up to do. Last year I spoiled his birthday weekend, big time. Yep, I graced his birthday with an unplanned 2-night hospital stay (no worries, I'm fine!) which resulted in him backing out of his guy's racing trip. Fortunately, my family is awesome and brought dinner, including a few slices of cheesecake, over for him to enjoy on his birthday, the day I came home.


This cheesecake was a year late, but JR said it was worth it! The combination of creamy filling, a slightly crunchy crust and the unique cinnamon layer in between makes for one unexpectedly light and unique dessert.

In terms of cheesecake, this was fairly easy to make. Although, it did end up with a huge crack in it after cooling, but after drizzling it I didn't think it looked too bad. I bumped up the ingredients for the crust since I have a 10 inch cheesecake pan. If your pan is smaller, check the original recipe.

Here is what you'll need:

For the Crust:
  • 2 cups graham cracker crumbs
  • 2 Tbsp sugar
  • 6 1/2 Tbsp butter, melted
Preheat oven to 325F degrees.

In a mixing bowl, combine crust ingredients until combined. Pour into cheesecake pan and press into bottom and up sides of pan.


Place pan in oven and bake for 8 minutes. Remove and set aside.

For the Filling:
  • 16 oz cream cheese, softened
  • 1 cup sugar
  • 1 tsp vanilla extract
  • 24 oz sour cream
  • 3 eggs, slightly beaten
  • 1 2/3 cup (10 oz) HERSHEY'S Cinnamon Chips, divided
  • 1 tsp shortening (do not use butter, margarine, spread or oil)
Increase oven temperature to 350F degrees.

Place cream cheese, sugar and vanilla in a mixing bowl. Beat on medium speed until well combined.

Add sour cream and beat on low until combined. Add eggs and beat on low until combined.

Pour 1/2 of filling mixture over baked crust and spread with a rubber spatula to level. Sprinkle 1 1/3 of cinnamon chips over filling. Pour remaining filling over cinnamon chips and spread with a rubber spatula to level.

Place cheesecake on baking sheet and place in oven. Bake for 1 hour until center is set, it jiggles slightly when the pan is tapped.

Remove from oven and cool for 10 minutes on a wire rack. Run a sharp knife around the inner edge of the pan to separate the cheesecake from the pan. Cool for another 30 minutes on a wire rack. Remove side of cheesecake pan and cool for another 1 hour on wire rack. (At this point, I covered the cheesecake and refrigerated it overnight.)

Combine cinnamon chips and shortening in a small bowl and microwave 30 seconds. Stir. Continue to microwave for 30 seconds and stir until chips are melted. Drizzle melted chips over the cheesecake, cover and refrigerate for 4 hours. (I did this step in the morning and served it the same evening). Serves 12 to 14.

Source: Hershey's

Sausage, Peppers and Onions to Feed a Crowd

2

Category: , ,

This post is an odd one. I've never posted something I haven't tried. There are very few things that I won't eat, but Italian sausage is one of them. JR is the taste tester for this dish, although I will admit that I did taste the peppers and onions to check for seasoning.


I also find it odd that this one dish I won't eat is often requested for gatherings, the only time I make it besides the occasional treat for JR when I won't be around for dinner. I suppose some day I may have to try it to see what the hype is all about. For now, I'll just keep it as an option to feed a crowd. I promise if you make this for your next gathering it will disappear in no time.

Here is what you'll need:
  • 8 lbs Italian sausage (I used 6 lbs sweet and 2 lbs hot), cut into large chunks
  • 3 green bell peppers, cut into large chunks
  • 3 red bell peppers, cut into large chunks
  • 3 Vidalia onions, cut into large chunks
  • 8 cloves of garlic
  • 2 Tbsp Italian seasoning
  • sea salt 
  • freshly ground black pepper
  • 1/4 cup olive oil
Preheat oven to 350 degrees.

Evenly split all of the ingredients into 2 large baking pans (I used a large disposable sterno rack pan and a large roasting pan). Mix everything to be sure the sausage, peppers and onions are evenly coasted with seasonings and oil.

Bake for 75-90 minutes, or longer if required, stirring occasionally until sausage is browned and cooked through. If you are cooking both pans at the same time, you may find the top pan browns and cooks through sooner than the bottom pan. If this happens, rotate the pans to the opposite rack at around 45 minutes.

When the sausage is done I dump it all into the sterno rack pan and cover it with aluminum foil so it can be kept warm during the gathering.

Servings: 32 based on 1/4 lb of meat per person and taking into account there is variety of food, including other meats, to choose from. For a normal dinner to serve 2-4, I would cut this down to 1 lb of meat and divide the other ingredients by 6.

Source: Adventures in My Kitchen original