spoon
Showing posts with label Cake/Cupcake. Show all posts

Strawberry Summer Cake

0

Category: , ,

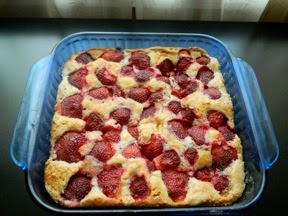
Cake or pie? Given the choice, I always choose pie and pie is what I was looking to make with our strawberries. That was until JR caught wind of my plans. Cake is his preference, and since I knew he'd more than likely be eating the majority of this treat, I went ahead and fulfilled his request.


I was pretty sold on this cake after reading the reviews. It was described as  having a "jammy" top and well, I do love anything strawberry jam! Plus, this was super simple to make which is a bonus in my book!

I'm rethinking my always choose pie decision. We gobbled this cake up at a very fast pace and I'm willing to bet you will too when you make it. It's already on my list of things to make when our short late strawberry season comes around in a few weeks.

Here is what you'll need:
  •  6 Tbsp unsalted butter, softened
  • 1 cup granulated sugar
  • 1 large egg
  • 1/2 cup milk
  • 1/2 tsp almond extract
  • 1 1/2 cup flour
  • 1 1/2 tsp baking powder
  • 1/2 tsp salt
  • 1 1/2 cup strawberries, stemmed and halved 
  • 2 Tbsp granulated sugar
Preheat oven to 350F. Grease 8x8 glass baking dish and set aside.

In the bowl of an electric stand mixer, cream butter and 1 cup sugar until fluffy, approx. 3 minutes. Add the egg, milk and almond extract and beat until well combined.

In a small bowl, combine flour, baking powder and salt. Slowly add dry mixture to wet mixture and beat until well incorporated.

Pour batter into greased baking dish. Place strawberries cut side down on top of batter. Sprinkle with remaining 2 Tbsp sugar.

Place in oven and bake for 10 minutes. Reduce oven temp to 325F and continue baking for 50-60 minutes, until a toothpick insert comes out clean (it may have some strawberry on it, but no wet batter should be visible). Cool on a wire rack before serving. Serves ~ 9.

Source: Slightly adapted from Martha Stewart as seen on Smitten Kitchen

Cherry Brownie Cups

0

Category: , , ,

Cherry Brownie Cups are another dessert I made for my sister-in-law's 50th birthday party, along with the Blood Orange Mini Cupcakes I already posted (and a few recipes still to come). I had taken these to her house before so I knew they would go over well with this crowd.

If you are entertaining a crowd anytime soon, make these. It's hard to resist a chewy brownie, filled with chocolate fudge cream and topped with a cherry!  Plus these are easy to make and super cute.


Even if you aren't entertaining soon, you could easily make a batch just because you need them in your life, and of course you could surprise with your neighbors or coworkers with 1/2 the batch!

For the Brownies:
  • 3/4 cup butter, cubed
  • 2 oz. unsweetened chocolate, chopped
  • 2 cups granulated sugar
  • 4 large eggs
  • 1 tsp vanilla extract
  • 1 cup all-purpose flour, sifted
Preheat oven to 350F. Line mini cupcake pan with cupcake liners.

In a medium saucepan over medium-low heat, melt butter and chocolate. Remove from heat and stir in granulated sugar until dissolved. Transfer mixture to a large bowl.

Add eggs, one at a time, beating well after each addition. Stir in vanilla and mix well.

Gradually add flour and stir until well combined.

Drop 1 Tbsp of batter into cupcake liner. Bake for 20-22 minutes, or until toothpick inserted into the center comes out clean.

Remove from oven and cool for 5 minutes. Using the handle of a wooden spoon, make an indentation in the top of each brownie. Remove brownies from pan and cool completely on wire racks.

For the Fudge Cream:
  • 3 oz. cream cheese, softened
  • 1 tsp vanilla extract
  • 1/4 cup corn syrup
  • 1 1/2 oz. unsweetened chocolate, chopped, melted and cooled
  • 1 cup confectioners' sugar
  • 1 jar (10 oz. maraschino cherries with stems, drained
In the bowl of a stand mixer, beat cream cheese and vanilla until smooth. Add corn syrup and melted chocolate (it's important that the chocolate is cooled), and mix until well combined. Add sugar and beat until smooth.

Transfer cream into a pastry bag with round tip, or alternately use a zip lock back with corner snipped off. Fill the brownie center with 1 tsp of cream. Top with cherry. Store in the refrigerator.

Makes 5 dozen.

Source: Taste of Home Holiday, November 2010 

Blood Orange Mini Cupcakes

1

Category: , ,

My dear sister-in-law recently turned 50. She's been planning a big party for about a year now and asked me to make the desserts. She left the dessert menu up to me, which ended up working perfectly since I decided on these cupcakes the morning of the party.


About a week before, I picked up a bag of blood oranges. I asked my cooking message board what I should use them for, but I never used any of their suggestions (sorry!). My last minute thought was to turn the blood oranges into a pretty pink cupcake to go with this Spring themed party. While the cupcakes didn't come out pink, the frosting filled that void.

These cupcakes were the perfect bite size treat, and incredibly moist with a hint of orange flavor. The candied oranges make these perfect, and like Annie, I would recommend you don't skip this step.

These would be great for a bridal or baby shower, Spring, Easter or tea party.

Stay tuned for more bite-size treats.

For the cupcakes:
  • 2 cups granulated sugar
  • 2 Tbsp blood orange zest
  • 1 cup unsalted butter, at room temperature
  • 4 large eggs
  • 1½ cups milk (I used 2%)
  • ½ cup freshly squeezed blood orange juice
  • 2 Tbsp vanilla extract
  • 4 cups all-purpose flour
  • ½ tsp baking powder
  • ½ tsp baking soda
  • ½ tsp salt
Preheat oven to 350F. Line mini cupcake pan with paper liners.

Place sugar and orange zest in a food processor and process until zest is finely chopped and combined with the sugar.

In the bowl of a stand mixer, combine sugar and butter and cream on medium-high speed until well combined, about 2-3 minutes. Add eggs one at a time and mix well.

In a medium bowl, combine milk, orange jusice and vanilla. Set aside.

In a medium bowl, combine flour, baking powder, baking soda and salt. Set aside.

Add 1/3 of flour mixture to butter mixture and beat on low until just combined. Add 1/2 liquid mixture to batter and beat on low until just combine. Repeat with additions of flour, liquid and ending with flour mixtures. Turn off mixer and scrape down sides of bowl. Mix batter on medium for about 30 seconds to make sure ingredients are well combined.

Fill each cupcake liner with 1 Tbsp of batter. Bake 10-12 minutes. Test by gently touching the cupcake tops, if they spring back the cupcakes are done. Be careful not to overbake.

Remove from oven and place cupcakes on cooling rack.

For the candied oranges:
  • 1½ cups granulated sugar
  • 1½ cups water
  • About 11 thin blood orange slices
In a large saucepan, combine sugar and water and place over medium-high heat. Once sugar is dissolved, place orange slices in the pan in a single layer with none overlapping. Reduce heat to medium-low and simmer for about 20 minutes. Turn orange slices once to allow both sides to become candied.

Remove orange slices from the pan and transfer to a container with a little liquid. Allow to cool before using.

Repeat process with remaining orange slices. You may use the same liquid for each batch, however, if the liquid starts to thicken or solidify you may need to start a new batch.

Once cooled, cut orange slices into 8 pieces.

For the glaze:
  • 4-5 Tbsp freshly squeezed blood orange juice
  • ~1/1/2 cups confectioners' sugar
Once cupcakes are completely cooled, turn cupcake upside down and dip top of cupcake into glaze just far enough so the glaze covers the entire top of the cupcake but doesn't touch the cupcake paper. Lift cupcake, allow excess glaze to drip off, then turn cupcake right side up and place on cooling rack. Repeat with remaining cupcakes.

Place 1 piece of candied orange on each cupcake.

Allow glaze to set (the shine will go away and it will look dry) before serving.

Makes 7 dozen mini cupcakes.

Source: Cupcakes and Candied Oranges are adapted from Annies Eats

Chocolate Chocolate Cupcakes with Strawberry Cream Cheese Frosting

2

Category: , , ,

Do you love chocolate covered strawberries? Me too! That's where this cupcake idea came from. Head on over to Carrie's Sweet Life where I am guest poster today to get the recipe.

Simple Chocolate Cupcakes with Ganache

1

Category: , , ,

This wasn't a planned post, but I decided to use it anyway. My coworker (and friend) and I were doing an experiment for work, we're trying to find a cooking example that mimics some of the processes in aluminum smelting. Whether or not this is a good example, I still don't know. One thing I do know is that I wouldn't mind if this becomes a good example, and if there are dozens of these in my future.


These cupcakes are both simple in terms of making the cake and frosting. They come together in a minutes, and don't require obsessing over how my frosting will look (please tell me I'm not the only one who worries about this!), because the ganache will look elegant no matter what.

One interesting thing to note is that there are no eggs in this recipe, so as long as you have pantry staples can go ahead and make these (you know, even on those days the meteorologists forecast a snowstorm and the grocery store's egg shelf is empty).

Here is what you'll need:

For the Cupcakes:
  • 1 1/2 cup all purpose flour
  • 1 cup sugar
  • 1 tsp baking soda
  • 8 tsp baking cocoa
  • 1/2 tsp salt
  • 6 Tbsp vegetable oil
  • 1 tsp vinegar
  • 1/2 tsp vanilla
  • 1 cup water
Preheat oven to 350F. Place cupcake papers in 12-cup cupcake pan and set aside.

In a mixing bowl, sift dry ingredients. Combine well. Make three holes in the mixture, one for the oil (make this one largest), one for the vanilla and one for the water. Place each wet ingredient in their hole.

Pour water over all the ingredients. Mix together well, being sure no dry ingredients are stuck on the bottom of the bowl.

Evenly divide batter into cupcake pan using a 1/4 cup measuring cup (it's actually just a little less than 1/4 cup each cupcake).

Place pan in middle rack of oven and bake 18-20 minutes. Test by gently touching the cupcake tops, if they spring back the cupcakes are done. Be careful not to overbake.

Remove from oven and place cupcakes on cooling rack.

For the Ganache:

  • 4.5 oz semisweet chocolate chips
  • 1/2 cup heavy cream
Once cupcakes are cool, place chocolate chips in a small bowl and set aside.

Pour cream into a small saucepan over medium heat. Bring cream just to a low rolling boil, being careful not to let it boil up and over the pan.

When the cream is ready, pour it over chocolate chips in bowl. Whisk until chocolate is melted and mixture is smooth. Allow to cool 3-5 minutes.

Take cupcake, turn upside down and dip top of cupcake into ganache just far enough so the ganache covers the entire top of the cupcake but doesn't touch the cupcake paper. Lift cupcake, allow excess ganache to drip off, then turn cupcake right side up and place on cooling rack. Repeat with remaining cupcakes.

Allow ganache to set before serving (note, the ganache will remain shiny and look wet, but to touch it will be set). Serves 12.

Source: Cooks.com (Cupcake) and Allrecipes.com (Ganache)

What's Baking: Red Velvet Cake with Cream Cheese Frosting

0

Category: , , ,

This month's What's Baking is hosted by Sandra from She Cooks and Bakes!. Sandra choose the theme Bake with Valentines Day Colors. While it may not be an original idea, I felt the deep red color of Red Velvet Cake was the perfectly represented Valentine's Day colors.

We hosted a family dinner a few weeks ago which we haven't done in a long time, we even missed hosting our annual Christmas Eve celebration. Our house was under renovation from August to January, so we were really excited that the chaos is over to host. By the way, the house looks fabulous (thanks Ryan!)!

Since it had been so long since we had anyone over, I went a little overboard with preparations. Actually, scratch that, I always tend to go a little overboard! Does that happen to you? Someone mentions a get-together and immediately my mind starts churning with ideas and I can't wait to get in the kitchen.


Sorry for the diversion! When I saw this recipe on the back of the cake flour box, I knew a cake was in order for our first post-renovation dinner. Plus I was intrigued by the frosting recipe which used a new-to-me method of preparation. It just so happened that this recipe called for shortening, which I had just used for these Chocolate Cappuccino Chip Cookies for the same dinner. I'm still not sure why I had shortening in the pantry, but I went ahead and used it (I normally would have subbed butter for the shortening).

Overall the dinner was great, and this cake was no exception. My stepmom loves Red Velvet Cake, so that fact that she (and everyone else) had no complaints left me feeling relieved. To be honest, I don't really know what a "good" Red Velvet is supposed to taste like, even after making Green Velvet Cupcakes for several of our annual St. Patrick's Day dinners! 

You'll see that my frosting was poured, rather than spread. I had a hard time getting the frosting to a spreadable consistency, even after letting it refrigerate for some time. I have feeling it was due to my inexperience with this method (I may not have let it cool enough?) and the use of low-fat cream cheese. Nonetheless, I think the poured frosting still looked nice and it tasted great. What cream cheese frosting doesn't taste great!

Be sure to check out She Cooks and Bakes! for the monthly round-up. Thanks for hosting Sandra!

Here is what you'll need:

For the Cake:
  • 1/2 cup shortening, or unsalted butter, softened
  • 1 1/2 cups sugar
  • 2 large eggs
  • 1/4 cup food coloring (I only used a .3 oz bottle and thought it was plenty)
  • 2 tsp unsweetened cocoa powder
  • 1 tsp salt
  • 1 cup buttermilk (I used 2% milk with a little extra vinegar)
  • 1 tsp vanilla extract
  • 2 1/2 cups plus 5 Tbsp sifted cake flour
  • 1 Tbsp vinegar
  • 1 tsp baking soda
  • 1/2 cup coconut
Preheat oven to 350 degrees. Line 2 9-inch cake pans with parchment paper and lightly spray with cooking spray.

Using an electric mixer, beat together shortening or butter and sugar until light and fluffy. Beat in eggs 1 at a time, combining well after each egg.

In a small bowl, whisk together food coloring and cocoa powder. Add cocoa mixture and salt to butter mixture, and beat until well combined.

In another small bowl, combine buttermilk and vanilla.  Alternately add flour and buttermilk to butter mixture, beginning and ending with flour.  Beat until well blended.

In another small bowl, combine vinegar and baking soda.  Gently stir into batter with a wooden spoon.

Divide batter evenly and pour into cake pans. Tap pans to release large air bubble. Place pans on middle rack in the oven and bake 35-40 minutes.  Test by gently touching the cake tops, if they spring back the cakes are done. Be careful not to overbake.

Cool cake in the pans on a cooling rack for 10 minutes.  Turn pans upside down on cooling racks and gently tap to release cake. Remove parchment from cakes and allow to cool completely before frosting. 

When cakes have cooled completely, prepare frosting recipe below.  Frost cake layers and sprinkle with coconut.

For the Frosting:
  • 1 cup milk
  • 3 Tbsp all purpose flour
  • 1/2 cup unsalted butter, softened
  • 8 oz cream cheese, softened
  • 1 cup confectioners' sugar 
  • 1 tsp vanilla extract
In a small saucepan, stir together milk and flour.  Cook on low heat, stirring constantly, until smooth and thick. Allow mixture to cool.  

Using and electric mixer, beat together butter, cream cheese, sugar and vanilla until well blended.  Add milk mixture and beat until well combined and spreadable.

Source: Slightly adapted from Swans Down Cake Flour

What's Baking: For the Gods Carrot Cake

0

Category: , ,

Dani from Cloud 8½ is the host of this month's What's Baking, and chose the theme A Family Favorite.  This immediately sent me to my Grange cookbook (circa 1975) which was a cookbook used by both sides of my family growing up.  Even though my handed-down copy is falling apart, and although I don't picture myself ever making roast pigeons or squirrel pot pie, I still treasure this cookbook and make several recipes from it.


It was hard for me to choose just one recipe, but I decided on For the Gods Carrot Cake since that was the first recipe I remember helping make from it and it was a childhood favorite of mine.  As you'll see from the ingredients, this is in no way healthy, but it's definitely the most moist cake I've ever eaten.

Here is what you'll need:
  • 3/4 vegetable oil
  • 2 eggs
  • 1 cup sugar
  • 1 cup all purpose flour
  • 1 tsp baking soda
  • 1 tsp cinnamon
  • 1/4 tsp salt
  • 1 1/2 cups shredded carrot
  • 1/2 raisins
  • 1/2 cup chopped nuts (I used pecans)
  • Confectioners' sugar
Preheat oven to 350F.  Grease bundt pan and set aside.

Beat oil, eggs, sugar, flour, baking soda, cinnamon and salt together for 5 minutes.  Add carrot, raisins and nuts, and mix well.

Pour into bundt pan and bake for 35 minutes, or until toothpick inserted comes out clean.


Cool in pan before turning out onto serving plate.  Dust with confectioners' sugar.  Serves 8-10.

    Source: National Grange Bicentennial Year Cookbook

    Quick and Easy Chocolate Cheesecake Trifle

    1

    Category: , ,

    Let's face it, we all have hectic schedules and a few shortcuts are welcomed every now and then.  That's exactly what happened to me over Memorial Day weekend.  I had grand plans of making homemade ice cream and popsicles, but the weekend got hectic and those plans didn't materialize.  Not to mention it was SOOO hot, and our air conditioners weren't in for the season.  That's when a suggestion from my sister crept into my mind.  I went with it and came up with this dessert that got me out of the kitchen in no time.  Unfortunately I didn't snap a photo of the final product, but I was able to capture one of what little remained...


    Now that I think about it, it would have been much cooler to make ice cream and popsicles vs. baking a pound cake.  Obviously the heat got to my brain!

    I ended up making a second shortcut dessert this weekend as well.  I used the strawberry mixture from my Strawberry Shortcake, adding blueberries to the mix, and served it over a store bought angel food cake with whipped cream.  Everyone enjoyed it just as much as if I'd made the whole thing from scratch.

    Here is what you'll need for the trifle:
    • 1 chocolate pound cake, cut into 1 inch cubes (I made a box mix according to package directions)
    • 2 packages cheesecake pudding
    • 3 cups milk
    • 1 cup heavy cream
    • 2 Tbsp confectioner's sugar
    • 1/2 tsp vanilla
    • chocolate syrup for drizzling
    In a medium mixing bowl, whisk together the pudding and milk until the powder is completely dissolved.  Chill in refrigerator until thickened.

    Make the whipped cream when you are ready to assembly the trifle.  Using an electric mixer at high speed, add heavy cream, sugar and vanilla to a chilled bowl.  Beat until stiff peaks form.

    To assemble the trifle, start by layering 1/3 of the pound cake in the bottom of a bowl, top with 1/2 of the pudding, drizzle with chocolate syrup.  Repeat the layers.  Top with whipped cream and drizzle with more chocolate syrup.  Serves 8-10.

      What's Baking: Strawberry Shortcake

      0

      Category: , ,

      It's time again for another addition of What's Baking.  This month was hosted by Leanne from The Martin Family blog.  Leanne chose Spring for this month's theme.  I can't wait to see what everyone came up with this month! 

      When I think of Spring, my mind wanders to my garden.  Most of my garden consists of annuals, but I have a few perennials.  The first edible perennials I planted were strawberries, and they are well established now and produce abundantly from late spring to late summer.

      I've made this Strawberry Shortcake by Emeril Lagasse a few times now and it's always well received.  The first time I served this was on a day my sister's bridal party was at my house planning her shower, so whenever I make this is brings back fond memories.

      With Easter coming, I knew this would make a great addition to our family's buffet.  Since this would be consumed by children, I omitted the Grand Marnier and used a sugar-free syrup and juice from an orange instead.  I completely cut out the sugar for the strawberries; 2 cups seemed completely unnecessary, actually ridiculous, to me.  I had every intention of adding orange zest to the cake itself, however, I completely forgot until the batter was in the pan and ready to go in the oven.  Next time!
      The changes I made are included here:

      For the Cake:
      • 1 cup (2 sticks) unsalted butter, melted and slightly cooled, plus 2 tsp, softened
      • 6 large eggs, at room temperature
      • 2 Tbsp milk, at room temperature
      • 1 1/3 cups granulated sugar
      • 2 cups all-purpose flour
      • 2 tsp baking powder
      • 1/4 tsp salt  
      • 4 Tbsp sugar-free raspberry syrup
      • Juice of 1/2 an orange
      For the Strawberries:
      • 3 lbs strawberries, rinsed, hulled, and sliced
      • 2 Tbsp sugar-free raspberry flavored syrup
      • 1 Tbsp agave
      • Zest of 1 orange
      • Juice of 1/4 an orange 
      For the Whipped Cream:
      • 2 cups heavy cream
      • 4 Tbsp confectioners' sugar
      • 1 1/2 tsp vanilla extract
      Preheat oven to 375 degrees.  Grease 9x13 glass baking dish with 2 tsp softened butter.

      Melt 2 sticks of butter and set aside to cool.

      In a stand mixer, beat eggs and milk until they begin to foam.  Add sugar, and beat on high for 7-10 minutes until the mix is thickened and pale yellow.

      Sift flour, baking powder and salt in a medium mixing bowl.  Carefully fold flour mixture into egg mixture until well combined.  Carefully fold melted butter into batter.

      Pour batter into preparing baking dish.  Bake for 30 minutes.  Remove from oven and let cool completely.

      Once cooled, cut into 1 inch cubes and poke holes over top of cake.  Drizzle with 4 Tbsp syrup and  juice from 1/4 of an orange.

      In a large mixing bowl, combine the strawberries, 2 Tbsp syrup, agave, orange zest and juice of 1/2 an orange.  Allow to set 30 minutes or until ready to assemble.

      Just before assembling, use a chilled stand mixer bowl and whip to beat heavy cream and confectioner's sugar on high until stiff peaks form.  Add vanilla and beat until combined.

      In a large serving bowl or trifle bowl, layer 1/2 cake, followed by 1/2 of strawberries.  Repeat with remaining cake and strawberries.  Top with whipped cream and serve immediately.

      Serves 12.  This filled my trifle bowl, plus made the 2 individual bowls you see above.

        What's Baking: Ostkaka (Swedish Cheesecake)

        2

        Category: , ,

        When I first saw the theme for this month's What's Baking, Bake From Your Nationality/Heritage, chosen by Amanda from Our Italian Kitchen, I was immediately overwhelmed. What's a mutt to do?  This is a serious question people!  I was stressed out about this for over half the month!

        After much debate, I settled on baking something from my mom's side of the family.  There aren't many family members left and I don't know a whole lot about their heritage (Aunt Deb, we need to work on this!).  I do know that my late Grandmother was Swedish and/or had Swedish in her.  Since I don't have many memories of her, and no memories of what she cooked, I wanted to bake something in her honor.

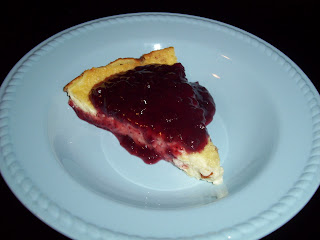
        After some research I came across Ostkaka, Swedish cheesecake, and thought this would be a good fit with the theme and my husband's love of cheesecake.  Coincidentally, or not, I had recently picked up a jar of lingonberry preserves from IKEA, which is the perfect, dare I say traditional, accompaniment for this dessert.


        I settled on this recipe from Dreaming of Winter blog mainly because I was being lazy and didn't want to use raw milk and rennet, nor did I want to convert all of the metric measurements found in most of the other recipes online.  Of course I couldn't leave the recipe alone, and made a few changes based on suggestions from other bloggers and recipes I found.  The result was a very subtly flavored cheesecake/pudding like dessert.  I'm glad that I added almond extract and extra sugar, because I think without those it would definitely be lacking in flavor.  Toasting the almonds would make this even better.


        After all my initial stress, I really enjoyed this month's challenge.  In fact, I've decided to investigate and cook or bake more from my heritage in the coming months.  Amanda, thank you for sparking that interest!

        Oh, and that blue plate...it was my Grandfather's.  I'm not sure if he had these when my Grandmother was alive, but I've decided to believe that is true since I don't know otherwise.

        The changes I made to the recipe are included here:
        • 3 large eggs
        • 7 Tbsp granulated sugar
        • 1/4 cup sliced almonds
        • 1/4 cup all purpose flour, sifted
        • 3/4 cup 1% milk
        • 3/4 cup heavy whipping cream
        • 2 1/4 cup 4% small curd cottage cheese
        • 1 tsp almond extract
        Preheat oven to 350 degrees.

        In a mixing bowl beat eggs with sugar until well combined.  Add almonds, flour, milk, cream and almond extract.  Combine well.

        Using a blender (a food process may work better), blend cottage cheese until smooth.  Add cottage cheese to mixing bowl.  Mix until everything is combined.

        Pour into cheesecake pan.  Bake for 1 hour.  Place on wire rack to cool.

        Run knife around edge of the pan to before remove side ring.  Serve with lingonberry preserves and/or whipped cream.

        Mini Peanut Butter Cheesecakes

        0

        Category: , ,

        I wanted to make JR something sweet for Valentine's Day.  He loves peanut butter and cheesecake, but I didn't want to make a whole cheesecake knowing it would be too much for us.  So I thought about making peanut butter cheesecake brownies, but then I remember his dislike of bar-like desserts.  Finally I settled on these Mini Peanut Butter Cheesecakes.


        I halved the original recipe and still ended up with 9, which I don't think he'll have a problem with!

        The changes I made are included here:

        For the crust:

        • 3/4 cup chocolate graham cracker crumbs
        • 2 Tbsp sugar
        • 2 Tbsp butter, melted
        • 9 bite-size peanut butter cups

        For the filling:

        • 8 oz. Neufchâtel (reduced fat cream cheese), at room temperature
        • 1/2 cup sugar
        • 1/8 cup all-purpose flour
        • 1/2 teaspoon pure vanilla extract 
        • 1 egg

        Preheat oven to 350 degrees. Place a cupcake liner in each cup of a standard muffin pan.

        To make crust, in a bowl, add graham cracker crumbs, sugar and melted butter and combine until crumbs are moistened. Press crumb mixture into bottom of each cupcake liner. Place 1 peanut butter cup on top of crumb crust and in the center of each cupcake liner.
        .
        To make filling, beat cream cheese in stand mixer until fluffy. Add sugar, flour, and vanilla and continue beating well. Add eggs, 1 at a time, beating well after each addition. Spoon cream cheese mixture over peanut butter cups and crumb crusts.

        Bake until just set, about 20 minutes. Allow to cool completely before serving.  Serves 6-9.