spoon
Showing posts with label Buttermilk. Show all posts

Buttermilk Banana Bread

3

Category: , , , ,

I can't believe I'm posting a recipe that involves baking. It's been way too hot to bake in the last few weeks, but a few weeks ago I did heat up the house to make this banana bread again. I originally made it on Easter for both of our family gatherings, and at both it disappeared in a flash. JR was disappointed it went so quickly and has been requesting it ever since. He describes it as "the best banana bread ever" and "bangin' good".


Whenever I buy bananas we never eat them all so I always have some on hand in the freezer. I freeze them as is with the peels on. When I need them in a recipe, I take them out and place them in a bowl of cold water until they begin to soften (generally less than 10 minutes). Peel, mash, and now they are ready to use!

Enjoy!

Here is what you'll need:
  • 1 cup flour
  • 3⁄4 tsp. baking soda
  • 1 cup sugar
  • 1⁄2 cup oil
  • 1⁄3 cup buttermilk
  • 1 tsp. vanilla
  • 2 eggs
  • 3 very ripe bananas, mashed
Preheat oven to 350F. Grease loaf pan and set aside.

Combine flour and baking soda in a small bowl.

In a large mixing bowl, combine remaining ingredients. Add dry mixture and mix until just combined, being careful not to overmix.

Pour batter into loaf pan. Bake for 60-65 minutes or until a knife or toothpick inserted into the center comes out clean. Remove from oven and allow to cool completely before cutting.

Source: Adapted from Saveur and What's Cooking Chicago via Carries Sweet Life

What's Baking: Bake in Season with Spring Produce

6

Category: , , ,

As I mentioned in my last post, this month was my turn to host What's Baking! I was so excited to be hosting at a time when Spring produce is at its finest! Our farmer's markets are starting to open around here and I'm always looking for ways to use the produce we find. At some point I hope to make everything submitted this month, and I hope something in this round-up inspires you to seek out Spring produce at your local farmer's market. There are so many great posts this month!


First up, we have Hezzi-D's Baked Penne with Roasted Vegetables. I love that Heather went with a savory meal option. I cannot wait to see these vegetables show up at the farmer's market!

Next up is Beantown Baker's Raspberry Rhubarb Muffins. Jen's blog is one of my go-to's when I'm looking for baking ideas. 'I see these muffins in my near future, a great way to use of the extra rhubarb I put in the freezer.


Here we have a first time participant, Newlywed and Newly Cooking's Strawberry Rhubarb Crisp with Almond Streusel looks delicious. Joanna also provides us a little comic relief in the form of a kitchen mishap, something I'm sure we can all relate to!


Another first time participant here, Pursuing Domestic Goddess-ness' Savory Cheese and Chive Bread. Catherine was happy to put her chive plant to good use, and gives us a tip on how to prepare fiddleheads.


Just Baked's Brown Sugar Berry Shortcakes takes the traditional shortcakes to another level with the addition of brown sugar.


Next up we have Jenna's Cooking Journey's Blueberry Lemon Loaf from another first time participant. I absolutely love that we have so many new participants this month!


Sweet Beginnings' Pineapple Zucchini Bread is a recipe I've made before. I save shredded zucchini in my freezer every year so I can make it again! Jaida, thanks for the reminder!

We had another blueberry entry from Yudith. Blissfully Delicious' Buttermilk Blueberry Breakfast Cake is an indication to me that it is perfectly fine to eat cake for breakfast!


Eva Bakes' Strawberry Greek Frozen Yogurt reminds us that Spring produce can be enjoyed cold as well!

Strawberries were popular this month as evidenced by Our Share of the Harvest's Strawberry Cupcakes with Buttercream Frosting. I wish Lindsey was able to box them up and ship them to me!


Love the creativity in Melissa's entry. I wonder if I Was Born to Cook's Strawberry "Donut" Bundt Cake could be considered breakfast?!


Another popular choice this month was rhubarb. Stephanie brings us Brownies and Blondies' Berry Rhubarb Pie which she adapted based on the berries currently available (or preserved from previous seasons).


Amanda is lucky enough to have peaches in season! Our Italian Kitchen's Stuffed Baked Peaches look like they would make a simple, yet elegant ending to any special dinner.


Sandra didn't have luck finding anything in season, but she did use local apples. Check out She Cooks and Bakes' Homemade Cranberry Apple Granola.


And lastly, I made Strawberry Rhubarb Dessert Bars


To all the ladies who participated, thank you for making this month's What's Baking a success!

Buttermilk Herb Dip

3

Category: , , ,

Finger foods Day 3. I had leftover buttermilk from Irish Soda Bread, so I knew I wanted to incorporate this into a dip for my vegetable platter. I was happy to come across this Buttermilk Pepper Dip on Simple Bites which I used for my base (by the way, isn't their presentation adorable!). I love using low-fat buttermilk in recipes, and the fact that along with light sour cream it helps cut back the calories and fat while boosting flavor!


I prepared this the night before, which I would recommend doing to allow the flavors to develop. I'm happy to have a little leftover to munch on and will definitely be making it again!

Here is what you'll need:
  • 1/2 cup low-fat buttermilk
  • 1/2 cup light sour cream
  • 1/2 cup mayonnaise
  • 1/2 teaspoon salt
  • 1/2 teaspoon freshly ground black pepper
  • 1 Tbsp Penzey's Sunny Paris Seasoning

Mix all ingredients together and allow to chill before serving.  Makes 1 1/2 cups.

Source: Adapted from Simple Bites

Irish Soda Bread

2

Category: ,

Before this year, I would use this recipe for Irish Soda Bread, however, every year I would get comments about the bread being a little dry. This year I opted to try a new recipe with great success. I must even admit that this adaptation from Emeril's Every Day is Party cookbook was much moister, tastier and simpler.


Here is what you'll need:
  • 4 cups bleached all-purpose flour
  • 1 teaspoon baking soda
  • 1 teaspoon salt
  • 1/4 cup raisins 
  • 2 cups buttermilk
Preheat oven to 450F. Grease baking sheet and set aside.

Combine flour, baking soda, salt and raisins in a mixing bowl. Add buttermilk and mix with a fork until a dough forms.

Lightly flour a work surface, either a board or countertop. Transfer dough from the bowl to the floured surface. Gently fold the edges into each other four times, turn over, then pat the dough out into a circle about 9 inches in diameter and about 1 inch thick.

Place dough on baking sheet. Using a knife, slice the top of the dough to make an X.

Place baking sheet in oven and bake 15 minutes. Turn oven temperature down to 400F. Continue baking bread for 25 additional minutes until bread is browned. To test the bread, tap on the top of the loaf and listen for a hollow thumping sound. Cut into 8 large slices or 12-16 smaller slices.

Source: Adapted from Emeril's Every Day is a Party Cookbook

What's Baking: Red Velvet Cake with Cream Cheese Frosting

0

Category: , , ,

This month's What's Baking is hosted by Sandra from She Cooks and Bakes!. Sandra choose the theme Bake with Valentines Day Colors. While it may not be an original idea, I felt the deep red color of Red Velvet Cake was the perfectly represented Valentine's Day colors.

We hosted a family dinner a few weeks ago which we haven't done in a long time, we even missed hosting our annual Christmas Eve celebration. Our house was under renovation from August to January, so we were really excited that the chaos is over to host. By the way, the house looks fabulous (thanks Ryan!)!

Since it had been so long since we had anyone over, I went a little overboard with preparations. Actually, scratch that, I always tend to go a little overboard! Does that happen to you? Someone mentions a get-together and immediately my mind starts churning with ideas and I can't wait to get in the kitchen.


Sorry for the diversion! When I saw this recipe on the back of the cake flour box, I knew a cake was in order for our first post-renovation dinner. Plus I was intrigued by the frosting recipe which used a new-to-me method of preparation. It just so happened that this recipe called for shortening, which I had just used for these Chocolate Cappuccino Chip Cookies for the same dinner. I'm still not sure why I had shortening in the pantry, but I went ahead and used it (I normally would have subbed butter for the shortening).

Overall the dinner was great, and this cake was no exception. My stepmom loves Red Velvet Cake, so that fact that she (and everyone else) had no complaints left me feeling relieved. To be honest, I don't really know what a "good" Red Velvet is supposed to taste like, even after making Green Velvet Cupcakes for several of our annual St. Patrick's Day dinners! 

You'll see that my frosting was poured, rather than spread. I had a hard time getting the frosting to a spreadable consistency, even after letting it refrigerate for some time. I have feeling it was due to my inexperience with this method (I may not have let it cool enough?) and the use of low-fat cream cheese. Nonetheless, I think the poured frosting still looked nice and it tasted great. What cream cheese frosting doesn't taste great!

Be sure to check out She Cooks and Bakes! for the monthly round-up. Thanks for hosting Sandra!

Here is what you'll need:

For the Cake:
  • 1/2 cup shortening, or unsalted butter, softened
  • 1 1/2 cups sugar
  • 2 large eggs
  • 1/4 cup food coloring (I only used a .3 oz bottle and thought it was plenty)
  • 2 tsp unsweetened cocoa powder
  • 1 tsp salt
  • 1 cup buttermilk (I used 2% milk with a little extra vinegar)
  • 1 tsp vanilla extract
  • 2 1/2 cups plus 5 Tbsp sifted cake flour
  • 1 Tbsp vinegar
  • 1 tsp baking soda
  • 1/2 cup coconut
Preheat oven to 350 degrees. Line 2 9-inch cake pans with parchment paper and lightly spray with cooking spray.

Using an electric mixer, beat together shortening or butter and sugar until light and fluffy. Beat in eggs 1 at a time, combining well after each egg.

In a small bowl, whisk together food coloring and cocoa powder. Add cocoa mixture and salt to butter mixture, and beat until well combined.

In another small bowl, combine buttermilk and vanilla.  Alternately add flour and buttermilk to butter mixture, beginning and ending with flour.  Beat until well blended.

In another small bowl, combine vinegar and baking soda.  Gently stir into batter with a wooden spoon.

Divide batter evenly and pour into cake pans. Tap pans to release large air bubble. Place pans on middle rack in the oven and bake 35-40 minutes.  Test by gently touching the cake tops, if they spring back the cakes are done. Be careful not to overbake.

Cool cake in the pans on a cooling rack for 10 minutes.  Turn pans upside down on cooling racks and gently tap to release cake. Remove parchment from cakes and allow to cool completely before frosting. 

When cakes have cooled completely, prepare frosting recipe below.  Frost cake layers and sprinkle with coconut.

For the Frosting:
  • 1 cup milk
  • 3 Tbsp all purpose flour
  • 1/2 cup unsalted butter, softened
  • 8 oz cream cheese, softened
  • 1 cup confectioners' sugar 
  • 1 tsp vanilla extract
In a small saucepan, stir together milk and flour.  Cook on low heat, stirring constantly, until smooth and thick. Allow mixture to cool.  

Using and electric mixer, beat together butter, cream cheese, sugar and vanilla until well blended.  Add milk mixture and beat until well combined and spreadable.

Source: Slightly adapted from Swans Down Cake Flour

Zucchini Corn Fritters

0

Category: , , , , ,

Are you still getting zucchini from your garden?  Do you still have access to local corn?  Are you looking for new ways to prep both?  Does this sound familiar?  I thought so, because this happens to me too, every year.  Enter this Zucchini Corn Fritter recipe.


I found this recipe when I was looking for a new way to use up zucchini.  Although I didn't get many zucchini from my garden this year, I wanted to try a new recipe, preferably something savory that was not a bread or muffin.  I made a savory zucchini muffin last year that ended up in the freezer and disguised as stuffing (trust me, they were not good!).

These fritters on the other hand did not end up in the freezer, there were none left, nor did they require a disguise.  Served with a fresh garden tomato salad, these made a great light summer meal.

Here is what you'll need:
  • 2 medium zucchini
  • sea salt
  • 1 Tbsp unsalted butter
  • 1/2 small onion, finely chopped
  • 1 clove garlic, finely chopped
  • 2 ears corn, kernels cut off 
  • 1/2 cup yellow cornmeal
  • 1/2 cup all-purpose flour
  • 1/4 tsp baking soda
  • Freshly ground pepper
  • 3/4 cup buttermilk
  • 1 large egg
  • Canola oil, for frying
  • salt 
Shred zucchini on grater.  Set in strainer, salt and allow to drain for 10 minutes.  Squeeze remaining liquid from zucchini.

Meanwhile in a small fry pan over medium-high heat, melt butter and saute onion and garlic until softened, stirring occasionally.  Add corn and saute about 3-4 minutes, stirring occasionally.

In a mixing bowl, combine cornmeal, flour, baking soda and pepper.

In a separate large bowl, beat buttermilk and egg together.  Add corn mixture and zucchini and mix well.  Add dry ingredients and mix until just combined, being careful not to overmix.

Coat bottom of fry pan with canola oil and heat to medium-high heat.  Using 2 soup spoons, scoop batter and place in hot fry pan.  Cook 3-4 minutes until brown, flip and brown other side another 3 minutes.  Remove from fry pan and place on paper towel.  Salt immediately and allow to cool slightly before serving.

I was able to get 11 fritters using this method.

Source: Food Network Magazine via Food Network

What's Baking: Zucchini Cornbread

0

Category: , , , ,

I'm so happy to be back participating in What's Baking!  This month's theme, Bake Local, was chosen by Lindsey from Our Share of the Harvest.  Lindsey's blog is dedicated to cooking local and a great resource when it comes to cooking from a CSA share.

It wasn't until this week that I nailed down a recipe and I'm glad I waited.  Zucchini season is now in full force, and every year I'm on the hunt for ways to use it.  Let's face it, zucchini is great, but it grows so rapidly that it tends to get overwhelming!  So began my hunt for a new way to use it.
 
The original of this recipe can be found on Baking Bites.  I think I did pretty good with the local ingredients, aside from the staple pantry baking ingredients.  In keeping with the local theme, I made several changes, subbing local honey for molasses, using local milk instead of buttermilk and adding corn.  I have to say that this experience was a real eye opener for me.  While I shop at farmer's markets, grow my own garden and look for local products at the grocery store, there are so many more opportunities for me to consider. 


JR and I both really enjoyed this cornbread!  JR liked that it was sweeter than my normal recipe, and I liked that it was very moist and a great way to add some veggies to our meal.  I can see us making this again, and it may even become our go-to recipe.  By the way, if you have picky eaters, aside from a few green flecks, I doubt they will even be able to pick up on the zucchini if you use the finest grate.

Here is what you'll need (items marked with * are local):
  • 1 Tbsp unsalted butter* 
  • 3/4 cup cornmeal
  • 1 cup flour
  • 1/4 cup brown sugar 
  • 1 1/2 tsp baking powder
  • 1/2 tsp baking soda
  • 1/2 tsp salt
  • 1 cup whole milk*
  • 1 egg*
  • 1 egg white*
  • 2 Tbsp honey*
  • 3 Tbsp unsalted butter*, melted
  • 1 corn cob*, kernels removed
  • 1 cup grated zucchini*, squeeze off excess liquid
Preheat oven to 400F degrees.  Grease an 8x8 pan with 1 Tbsp of butter.  

In a large mixing bowl, add cornmeal, flour, brown sugar, baking powder, baking soda and salt.  Mix well.

In a separate mixing bowl, add milk, egg, egg white, honey and melted butter.  Whisk until well combined.

Pour milk mixture into dry mixture.  Stir until just combined.  Add corn and zucchini and stir gently until evenly distributed.

Pour batter into greased pan.  Tap pan on the counter a few times to let out any air bubbles.

Bake for 25-30 minutes, until toothpick inserted comes out clean.  Allow to cool before cutting and serving.  Serves 9.

Bacon Ranch Pasta Salad (Suddenly Salad Knock-off)

3

Category: , , , ,

As much as I like to cook homemade, I have no problem using boxed items from time to time.  Suddenly Salad Ranch & Bacon is one of those boxed items that I tend to go to for cookouts, because it goes over well with my family, particularly those who are less adventurous and/or don't like vegetables.  I am one of those people who likes to prepare enough side dishes so that there is at least one for each guest to eat (but sometimes I secretly want to just make what I like!).

When preparing for a recent cookout, I decided to try my hand at a knock-off.  After all, I almost always have these ingredients on hand, so why would I go out and buy the box?  While I'm sure I'm not the first to have made this, my only reference point was my memory of the prepared box mix.

The resulting salad was way more flavorful than any box can produce!  For starters, we're talking REAL bacon here.  Not only that, I had a bit better idea of what is in this, aside from the ranch mix, and I cut back some calories and fat by using milk, buttermilk and mayonnaise with olive oil.  Next time, I want to make a homemade ranch dressing, which I'm sure will bring this salad to a whole new level.

By the way, how can someone not like vegetables?  I will never understand.

Here is what you'll need:
  • 1 lb bowtie or other shaped pasta
  • 1 cup frozen peas
  • 1/2 lbs bacon, cooked crisp and divided
  • 1/4 cup milk
  • 1/4 cup buttermilk
  • 1/2 cup mayonnaise with olive oil
  • 1 packet powdered ranch salad dressing mix
  • black pepper to taste
Bring salted water to a boil.  Add pasta and continue boiling 10 minutes.  Add frozen peas to water and continue boiling 2 minutes, or until cooked to al dente.  Strain pasta and peas, run under cool water to stop the cooking process and allow to drain well.

In a large fry pan over medium-high heat, cook bacon until crisp.  You may need to do this in several batched depending on the size of your pan.  Remove crisp cooked bacon from pan and drain on a plate lined with paper towel.  Allow to cool completely.  Crumble into bite size pieces.

In a large mixing bowl, add milk, buttermilk, mayonnaise with olive oil, ranch salad dressing mix and black pepper.  Whisk until well combined.

Add pasta and peas to dressing.  Gently toss until the pasta is well coated.  Add 1/2-3/4 of the cooked bacon and gently toss to combine.  Top with remaining bacon.  Serves 8-10 as a side.

    Shrimp and Peas Pasta Salad with Buttermilk-Herb Dressing

    0

    Category: , , , , ,

    It just so happened we had a late work night the day I planned to make this pasta salad I had seen in Cooking Light's June 2011 magazine for dinner.  Needless to say, I was starving by the time I left work and that usually means I'd order take-out to pick up on my way home.  While take-out was tempting, I knew this recipe was planned for dinner and I thought I could make it quicker than I could gnaw my arm off.


    My arm is still attached!  And I am so glad this won over take-out!  Not only is this easy to make, it is packed with flavor and what I would consider it fairly healthy.  I used whole grain pasta and mayonnaise with olive oil.   

    Here is what you'll need:
    • 8 ounces uncooked medium shell pasta (I use whole grain)
    • 1 cup frozen green peas
    • 1 lb small-medium shrimp, peeled and deveined (I used the small, sweet, pink Maine shrimp)
    • 1 cup thinly sliced radishes
    • 1/3 cup mayonnaise with olive oil
    • 1/4 cup low fat buttermilk
    • 3 Tbsp minced fresh chives
    • 1 Tbsp chopped fresh dill
    • 1/2 tsp salt
    • 1/2 tsp grated lemon rind
    • 1 Tbsp fresh lemon juice
    • 1/4 tsp freshly ground black pepper
    • 1/8 tsp ground red pepper
    • 2 garlic cloves, minced
    Bring water to a boil and cook pasta according to package directions, adding the shrimp and peas during the last 2 minutes of cooking.  Drain and rinse with cold water to stop cooking process.  Allow to set in order to drain off excess water.

    While pasta is draining and cooling, in a mixing bowl combine remaining ingredients.

    Add cooled pasta, shrimp and peas to mixing bowl.  Toss to combine well and refrigerate at least 30 minutes.  Serves 3-4 as a main dish.

    Warm Apple Buttermilk Custard Pie

    3

    Category: , , ,

    I remember a few years back having extra buttermilk and looking for recipes to use it up.  I was tired of throwing away perfectly good buttermilk.  It took me a while to figure out there are a number of uses for it: pancakes, waffles, fried chicken, biscuits (which I don't particularly care for), and I've even used it in my macaroni and cheese.  Buttermilk pie was one thing that always seemed strange and unappealing to me.  Pie is my favorite dessert, so I finally decided to give it a try, and boy was I surprised.  It was good, really good!

    Recently I had extra buttermilk and began my search for even more uses.  I thought back to that first buttermilk pie I made, and began searching for other pie variations.  When I came across this recipe I was intrigued; a cross between buttermilk, custard and crumb top apple pies.  I immediately set out to make it!


    I did alter the recipe a bit, cooking the apples in brown sugar vs. regular sugar, and I used an additional apple based on the reviews I read.  I also didn't read through to the end of the recipe, so I added the crumb topping before it baked, instead of allowing to make some and then adding it.  I think the brown sugar was too much because this was VERY sweet, too sweet for me, however, adding the crumb topping early wasn't an issue!

    JR loved it so much he ate two huge pieces before it even fully cooled.  I think this would be well received as a Thanksgiving pie, and may make an appearance on our Thanksgiving table this year.

    The changes I made are included here:

    For Apple Filling 
    • 1/4 cup butter
    • 2 green and 1 red apple, peeled, cored and sliced
    • 1/2 cup sugar (I used brown sugar)
    • 1/2 tsp ground cinnamon
     For Custard:
    • 1/4 cup butter, softened
    • 1 1/3 cups sugar
    • 4 eggs
    • 1 tsp vanilla extract
    • 2 Tbsp all-purpose flour
    • 3/4 cup buttermilk
    For Crumb Topping:
    • 1/4 cup sugar
    • 1/4 cup packed brown sugar
    • 1/2 cup all-purpose flour
    • 1/4 tsp ground cinnamon
    • 3 Tbsp butter
    • 1 pie crust (I used a frozen one)
    Preheat oven to 300 degrees.

    To make Apple Filling: In a skillet over medium meeat, melt 1/4 cup butter.  Add apples, 1/2 cup sugar, and 1/2 teaspoon cinnamon.  Cook 3 to 5 minutes, until tender.  Set aside.

    To make Custard: In the bowl of a stand mixer, combine 1/4 cup softened butter and 1 1/3 cups sugar, and beat until creamy.  Add eggs one at a time, beating until they are no longer yellow.  Add vanilla and 2 Tbsp flour, and combine well.  Pour in buttermilk and beat until smooth.  Set aside.

    To make Crumb Topping: Combine 1/4 cup sugar, 1/4 brown sugar, 1/2 cup flour, and 1/4 tsp cinnamon in a small bowl.  Cut in 3 Tbsp butter or margarine until mixture is crumbly.

    Spoon Apple Filling into pie crust.  Pour Custard over Apple Filling.  Top Custard with Crumb Topping.

    Place in preheated oven and bake for 70 to 80 minutes, until a knife inserted in center comes out clean. Let stand 1 hour before serving.  Serves 8.

    What's Baking: Mixed Berry Cobbler with Cornmeal Crust

    1

    Category: , , , ,

    I recently joined What's Baking, a group of women who bake once a month based on a theme chosen by one of the group members. February's theme is Baked with Love which was chosen by Dunne' of With a Cherry on Top. I know a lot of you are thinking this was a Valentine's theme, but I decided to go another direction with it.

    You see, there is a special woman in my life who happens to have a birthday in February. I met her about 6.5 years ago, but I don't think I realized how much my heart grew for her until about 2 years ago. That was when I realized how important it was for me to have her stand up in our wedding, and today I am happy to call her my sister-in-law.

    Unfortunately, last year the unthinkable happened. She was diagnosed with breast cancer, and it absolutely broke my heart. I never let her see it, but there were many times I cried and worried for her, her husband, her children and her grandchildren. While her diagnosis is that this is treatable, and beatable, it still broke my heart to know the amount of pain and life changes she would go through, and is going through. But she is tough, and boy has she proven it through the last 9 months. 


    However, one of the life changes for her means she was diagnosed with diabetes during her treatment.  So as much as I know she would love a sugar laden birthday dessert, I wanted to give her something that she could enjoy guilt-free.  So here is the Mixed Berry Cobbler I decided on, which was Baked with Love in celebration of her birthday and life!
    You can check out this month's recipe roundup here.

    I followed the recipe pretty close to how it is written.  I was told the filling was nice and tart, and the biscuits were buttery!

    For the filling:
    • 2 Tbsp SPLENDA® Sugar Blend
    • 2 Tbsp cornstarch
    • 30 oz. frozen mixed berries, thawed
    For the crust:
    • 1 cup all-purpose flour
    • ½ cup stone-ground cornmeal
    • 2 Tbsp SPLENDA® Sugar Blend
    • 1½ tsp baking powder
    • ½ tsp salt
    • ¼ cup cold butter, cut into chunks
    • ¾ cup fat-free buttermilk
    Preheat oven to 350 degrees. Spray an 8 x 8-inch baking dish with cooking spray. Set aside.

    For the berries: 
    In a mixing bowl, combine SPLENDA® Sugar Blend and cornstarch.  Add berries, including their juice.  Gently stir to combine. Pour into prepared baking dish.

    For the crust:
    In a small bowl, combine flour, cornmeal, SPLENDA® Sugar Blend, baking powder, and salt. Stir with a fork. Add butter and cut  into dry ingredients until pieces are pea-sized. Add buttermilk and stir until just moistened.  Drop crust batter over fruit.

    Bake 40 to 45 minutes, or until topping is golden and fruit is bubbling. Let stand 20 to 30 minutes before serving to allow sauce to thicken.  Serves 9.

    Chicken and Biscuit Pot Pie

    2

    Category: , , , ,

    I've been craving chicken pot pie, seriously craving it.  I knew this was not going to be good for my weight loss efforts, so I began searching for something that would satisfy my craving without sending me off track. I found this recipe by Ellie Krieger.


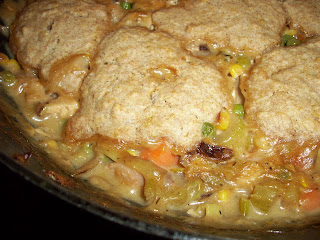
    The filling came together nicely, however, as I was making the biscuit topping I began second guessing the outcome.  I was wrong.  This came out great.  So great, I didn't miss the traditional pie crust, and I can't believe I'm saying that.  After all, the pie crust was always my favorite part of chicken pot pie, the frozen ones.  Now that I think about it, the pie crust was really the only good part of the frozen ones.  I realize now how much a great tasting filling can make this whole dish.


    My biscuits didn't brown up like I was hoping, even after I baked it a little longer than suggested.  However, they were cooked through and tasted fine.

    I used a few short cuts which I've included here
    • Cooking spray
    • 3/4 tsp salt
    • 1/2 tsp freshly ground black pepper
    • 1 1/2 lbs boneless, skinless chicken breasts, cut into chunks (I used leftover rotisserie chicken)
    • 4 tsp olive oil
    • 1 medium onion, chopped (I used 1 leek and 1/2 an onion)
    • 2 medium carrots, chopped
    • 2 celery stalks, chopped
    • 1/2 lb green beans, trimmed and chopped into 1/2-inch pieces (I used frozen corn instead)
    • 2 cloves garlic, minced
    • 1 1/2 cups lowfat milk
    • 1/4 cup all-purpose flour
    • 1 cup low-sodium chicken broth
    • 1 cup peas, thawed if frozen
    • 1 1/2 Tbsp fresh thyme leaves (I used 3/4 tsp dried thyme)

    • 1/2 cup whole-wheat flour
    • 1/4 cup all-purpose flour
    • 3/4 tsp baking powder
    • 1/4 tsp baking soda
    • 1/4 tsp salt
    • 3 tsp cold unsalted butter, cut into small pieces
    • 2 tsp canola oil
    • 1/2 cup lowfat buttermilk

    To make the filling: Preheat the oven to 375 degrees F. Spray a large shallow casserole dish, or 6 individual casserole dishes with cooking spray. (I used my oven safe skillet.)

    Season the chicken with 1/4 teaspoon each salt and pepper. In a large nonstick skillet, heat 2 teaspoons of the oil over a medium-high heat. Add the chicken to the pan and cook for 5 minutes, stirring occasionally. Transfer the chicken with its juices to a bowl. (Since I used rotisserie chicken, I skipped this part.)

    Add olive oil to skillet and heat it over a medium-high heat. Add the onions, carrots and celery and cook until the vegetables begin to soften, about 3 minutes. Add the green beans, garlic and remaining salt and pepper and cook for 2 minute more. Add the milk.

    Stir the flour into the broth until it is completely dissolved and add to the pan. Cook, stirring, until the mixture comes to a boil.

    Reduce the heat to medium-low and cook for 2 minutes more. Return the chicken with its juices back to the pan. Add the peas and thyme and stir to combine. Season with salt and pepper, to taste. Spoon the mixture into the baking dish or individual dishes. (If using oven safe skillet, you can use the same pan.)

    To make the crust: Put the whole-wheat flour, all-purpose flour, baking powder, baking soda and salt into a food processor and pulse a few times to combine. Add the butter and pulse about 12 times, or until pebble sized pieces are formed.  (I mixed all by hand using a fork.)

    Add the buttermilk, then oil to the food processor and pulse until just moistened. Do not over mix. (Again I mixed by hand.)

    Drop the batter in 6 mounds on top of the chicken mixture (1 mound on each individual dish, if using) spreading the batter out slightly. Bake until filling is bubbling and the biscuit topping is golden brown, about 20 minutes.  Serves 6.