spoon

Black Current Tea Ice Cream

1

Category: ,

I'm having a hard time writing this post in between spoonfuls of ice cream. I don't have much to say besides, YUM! You must try this! Make this soon! And be careful not to mistaken the ice cream base for tea and drink it before you churn it!

Tea Infused Milk/Cream
Custard
Strained Custard
After Freezing 2 1/2 Hours
I never think to use tea for anything other than, well, drinking tea. Boy, have I been missing out! Black currant tea is one of my favorites varieties, and the flavor it imparts in this ice cream is divine! I need to think about other ways to infuse the flavor into treats.

In the meantime, I hope I don't eat too much ice cream to keep me from sleeping tonight... But if I do, I'll just have an excuse to whip up another batch!

Here is what you'll need:
  • 1 cup whole milk (I used 2% and it was still very creamy!)
  • 2 cups heavy cream
  • 3/4 cup sugar
  • 1/4 cup black current tea leaves
  • 5 large egg yolks
In a saucepan over medium-low heat, warm milk, 1 cup of cream, sugar and tea leaves. Once warmed, remove from heat, cover and set aside to steep for 1 hour.

Warm milk mixture again over medium-low heat.

Whisk egg yolks in another mixing bowl. Slowly add warm milk mixture to egg yolks, whisking constantly. Return mixture to saucepan. Heat saucepan over medium heat, stirring constantly until mixture thickens and coats the back of a spoon.

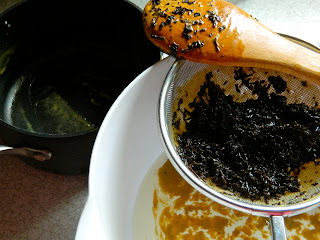
Pour remaining cream into a large mixing bowl. Place a mesh strainer over bowl. Pour custard through the strainer. Gently press tea leaves to strain out all the liquid.

Make an ice bath of ice and water in another large mixing bowl. Place bowl of custard into the ice bath. Stir custard over ice bath until cooled. Place custard in the refrigerator to chill completely.

Churn the custard in an ice cream maker according to the manufacturer's instructions.

Source: Perfect Scoop

What's Baking: Wheat English Muffins

3

Category: , ,

It's What's Baking time and this month the host is Lindsay of Peace, Love and French Fries. I'll be honest, when I first saw this month's theme I audibly declared "NO!" It was the feared ingredient of many, and if you haven't guessed yet, the theme was "Baking with Yeast."

"Baking with yeast" is not a response you'd hear from me if you were to ask me what I was doing in the kitchen on any given day. Nope. However, I have used it a few times in the past, notably for pizza dough (which reminds me that I need to get that recipe posted soon).

I suppose there was no better time to stretch myself past pizza dough than this month. Without further adieu, I bring you Wheat English Muffins which I can say I had fun making!

First Rise
Kneaded, Ready to Roll
Cut to Size
Second Rise
First Side on the Griddle
We have English Muffins!
I'm the English Muffin lover in this house, it's my bread of choice for breakfast sandwiches. JR will only eat them if there is no other bread to choose from, and if they say "wheat" he'll opt out of breakfast sandwiches all together. When I asked him if he was going to try these he said of course, and after finishing the first one asked for another with peanut butter and jelly. I guess it's safe to say these are good and there was no need for him to know they were of the wheat variety!

Be sure to check out Peace, Love and French Fries for the round-up, and be sure to check back here next month for another round of What's Baking hosted by ME!

Here is what you'll need:
  • 1 1/4 cups milk 
  • 3/4 tsp salt
  • 1/4 warm water
  • 1 package of dry yeast
  • 2 1/2 cups all purpose flour
  • 1 1/2 cups whole wheat flour
  • 3 Tbsp shortening, melted
  • corn meal for dusting
Scald (click here to learn how) milk in a saucepan over medium heat. Add salt and stir to dissolve. Remove from heat and allow to cool to lukewarm.

In a large mixing bowl, dissolve yeast in warm water. Add milk mixture to water mixture. Add 1/2 the flour, sifted, 1 cup at a time, mixing with a wooden spoon after each addition. Add melted shortening and mix well. Add remaining flour, sifted, 1 cup at at time, mixing well.

Lightly grease a second large mixing bowl. Place dough in greased mixing bowl. Lightly brush with water. Cover with plastic wrap. Allow to rise 2 hours in a warm place until doubled in size.

Remove dough from bowl and place on lightly floured surface. Knead a few times to form a dough ball. Roll dough to 1/2 inch thickness. Using a biscuit cutter or glass about 3-4 inches in diameter, cut out English muffin rounds.

Sprinkle corn meal on a baking sheet. Place English muffin rounds on baking sheet. Cover with plastic wrap and allow to rise 45 minutes.

Lightly grease and preheat griddle to 300F. Place English muffin rounds on griddle (corn meal side down) and cook for 10 minutes. Flip and cook second side 10 minutes. Move to wire rack to cool completely.

After they are completely cooled, they can be frozen in ziplock bags. Makes 15+ (depending on diameter).

Source: Adapted from Weekend Cook

Goat Cheese Stuffed Pork Chops

1

Category: ,

I'm trying to get better at keeping things simple on weeknight. I was starting to loose interest in cooking during the week, and I realized the problem is that I tend to complicate things. Since my husband is just as happy eating a sandwich as a multi-course meal, I realized I should make things a little easier on myself. Here is a great example which was inspired by Melissa's Fig & Gorgonzola Stuff Pork Chops.


With a few simple ingredients, I had 1/2 of our meal packed with flavor and ready within minutes. The side I served was not so simple, and not that great, so I'll spare you those details. This is really more of a method than a recipe, just take a look at what you have on hand and go from there.

Here is what you'll need:
  • 2 thick pork chops
  • 2 oz honey goat cheese (or any type of cheese)
  • 3 tsp dried cranberries (or any type of dried fruit)
  • salt and pepper
  • olive oil  
Slice pork chops horizontally, cutting almost all the way through but being careful to leave them in 1 piece.

Stuff each pork chop with 1 oz goat cheese and 1 1/2 tsp dried cranberries. Salt and pepper the outside of the pork chops.

Heat olive oil in a pan over medium-high heat. Place pork chops in the pan and let cook 5-7 minutes until browned. Flip over and cook another 4-6 minutes until browned and cooked through.
    Source: Inspired by I Was Born to Cook

    Arroz con Camarones

    4

    Category: , , ,

    Last year I was thrilled when Jessica helped me discover a good Arroz con Pollo. I've lost count of how many times I've made it as is, but I've only tried adapting it a few times to include other meats and additions.  Each time I've had pretty good success, but none was better than this Arroz con Camerones. 


    One thing that I've learned in the past year, is that the wider the base of my pan the better my rice comes out. I now reach for my double fryer pan vs. a pot when I make this as I think I get a better final product.

    This makes an easy weeknight meal, served with a simple salad and of course a side of avocado as well!

    Here is what you'll need:
    • 2 Tbsp olive oil
    • 2/3 cup sofrito (I used Goya frozen sofrito)
    • 1/4 cup olives with pimentos (I prefer Goya Alcaparrado)
    • 1/2-3/4 cup frozen green peas
    • 1 chicken bouillon cube
    • 2 packages Sazon: Con Culantro Y Achiote 
    • 1 tsp Adobo
    • 1 lb shrimp, peeled and deveined
    • 2 cups hot water
    • 2 cups white medium grain rice (I prefer Goya)
    In a large double fryer pan over medium high, heat olive oil.  Add sofrito, olives, peas, chicken bouillon, Sazon and Adobo. Mix well to combine and cook for 3-5 minutes. 

    Add shrimp and stir to coat shrimp with seasonings.

    Add hot water and rice, and bring to a boil. Stir, reduce heat to medium-low and cover.

    Let cook over medium-low, covered, without opening or stirring (really, no peaking!), for 22-25 minutes.  Uncover, stir once and serve.  Serves 4.

    Source: Originally seen on The Novice Chef

    Product Review and Giveaway: Over the Moon Milks

    5

    Category: ,

    Recently I was chosen by Over the Moon Milks to review their products. I was pretty excited to be chosen because this is my first product review, and since I've already purchased this product many times I knew I could share a positive review (is this cheating?)! The only sad part about this post is that my store only had 1 type, the 1% Low-Fat Milk. Oh how I wish they had the Chocolate Fat Free Milk in stock!


    I must confess, I'm not a very big fan of milk. However, I've purchased Over the Moon Milks several times and I'm drawn to their brand because frankly, it just tastes better to me than other brands. My favorite is their 1% Low-Fat Milk, and a close second is their Chocolate Fat Free Milk (let's be honest, this is actually my favorite, but I buy it less often!).

    What are some other reasons why I love Over the Moon Milks?
    1. They contain more calcium than whole milk (400 mg per cup!)
    2. They contain more protein than whole milk (11 g per cup!)
    3. I find they taste creamier than other brands of the same type
    4. I find they stay fresh longer than other brands
    5. Their packaging; I love the carton and screw cap (vs. plastic and pop top)
    Now for the giveaway. Over the Moon Milks has generously offered to give 3 readers of mine an Over the Moon sipper cup! 


    You have 3 chances to enter:
    1. Leave a comment letting me know your favorite type of milk
    2. Leave a comment below that you "Like" us on Facebook
    3. Leave a comment below that you "Like" Over the Moon Milks on Facebook (after you "Like" their page you can download a coupon!) 
     Giveaway Rules: CLOSED
    • No purchase necessary
    • Maximum 3 entries per person, leave a separate comment for each
    • Giveaway ends April 4 at 11:59 PM EDT
    • 3 winners will be selected by a random number generator
    • Winners must supply a valid email address in the comments
    • Winners will be contacted and have 3 days to respond, at which point winner forfeits the prize and another winner will be chosen
    • Winners will provide name, email address, shipping address and phone number which I will supply to the sponsor of the giveaway item
    • Prize can only be shipped to a US address
    Disclosure: I was compensated by Over the Moon Milks in order to buy the product for this review, however, the opinions expressed here are entirely my own.